
Canon R5 First Impressions: A DSLR Diehard tries Mirrorless

So I Bought an R5
First, A Little Background Info
The R5 is a new experience for me. I've been using SLR cameras (with and without the "D") for over 20 years. They're the best cameras for composing your shot because you're literally seeing through the lens using a mirror and a prism. You're seeing exactly the same thing as the camera. Obviously this makes for more accurate compositions when shooting with a film camera because the alternative is to use a viewfinder that is essentially a hole in the camera that doesn't see exactly the same thing as what's going to end up on film. When digital cameras came about, they added the ability to essentially do the same thing: see the same thing as what the camera sees. While the composition was the same, however, it wasn't exactly the same user experience as an actual optical viewfinder. You didn't have (or at least I didn't have) the same kind of connection to the shot.
Why Viewfinders Are Better Than LCD Screens
When you put a viewfinder up to your eye, you don't see anything but the shot. There are no visual distractions outside the camera's field of view. When composing your shot on a screen, you're seeing everything else around it: the camera body, your hand and that weird-looking bird in that tree over there. You see whatever enters into your peripheral vision. On top of that, you aren't literally seeing the actual subject, you're seeing a projection on a screen. It's like hooking a video camera up to a tv and pointing the camera out the window. You aren't looking at what's outside the window, you're looking at a projection of it on a screen. For me at least, there's a psychological disconnect between my brain and the shot I'm trying to set up when I'm using a digicam screen.
So Where Am I Going With This?
About 10 years ago (maybe a little more), a new camera design came on the market: the mirrorless camera. It was essentially a DSLR with out the optical viewfinder (OVF). In its place was an electronic viewfinder (EVF), which was essentially another screen. Removing the OVF and the associated prism and mirror allowed for a camera that was smaller and lighter, but it came with a big sacrifice. Gone was the nice, clear OVF. It was replaced with a small, kinda dark, crappy screen with low detail and a lag. I couldn't stand looking through them. That was my biggest complaint about them then and it stays true to this day. The EVFs on mirrorless cameras are much better today than they were back then, but to me that just makes them less terrible than they were. You would think they'd at least look as good as the screen on the back of the camera, but they don't.
But they have their advantages. Aside from the size and weight reduction, an EVF allows for an autofocus system that can focus on subjects right to the edge of the frame. It can use face-recognition algorithms to be able to focus on a subject's eye. If you're shooting video, it allows you to shoot using the viewfinder, making it more stable than using the rear lcd because your elbows are tucked in. It's these advantages that have allowed mirrorless cameras to catch up to and surpass DSLRs in popularity over the last few years.
Why I Bought One
So I saw the writing on the wall. As much as I dislike EVFs, I understand that DSLR cameras (at least at the pro level) will probably disappear from the market in the next little while. I figured I may as well start getting used to these new cameras sooner rather than later. At the beginning of this year, I ordered a Canon R5 camera. It's in high demand and short supply, so I had to wait 6 weeks for it to show up on my doorstep. I finally received it a little over a week ago. So after playing around with it and using it on a few jobs, here are my initial thoughts.

There's an obvious size difference between these two cameras.

The weight difference is noticeable, too.
R5 First Impressions
I won't bore you with the unboxing nonsense. It comes with a battery, a charger, a strap and a cable, just like every other digital camera. It's definitely lighter than my 5D IV that has been my main camera up to this point, and the grip is nice and comfortable. It uses the same battery as my other two cameras, which means I now have 5 batteries for it. No need to buy a spare. The menu system is the same as my other cameras with a few additions, so no real learning curve there.
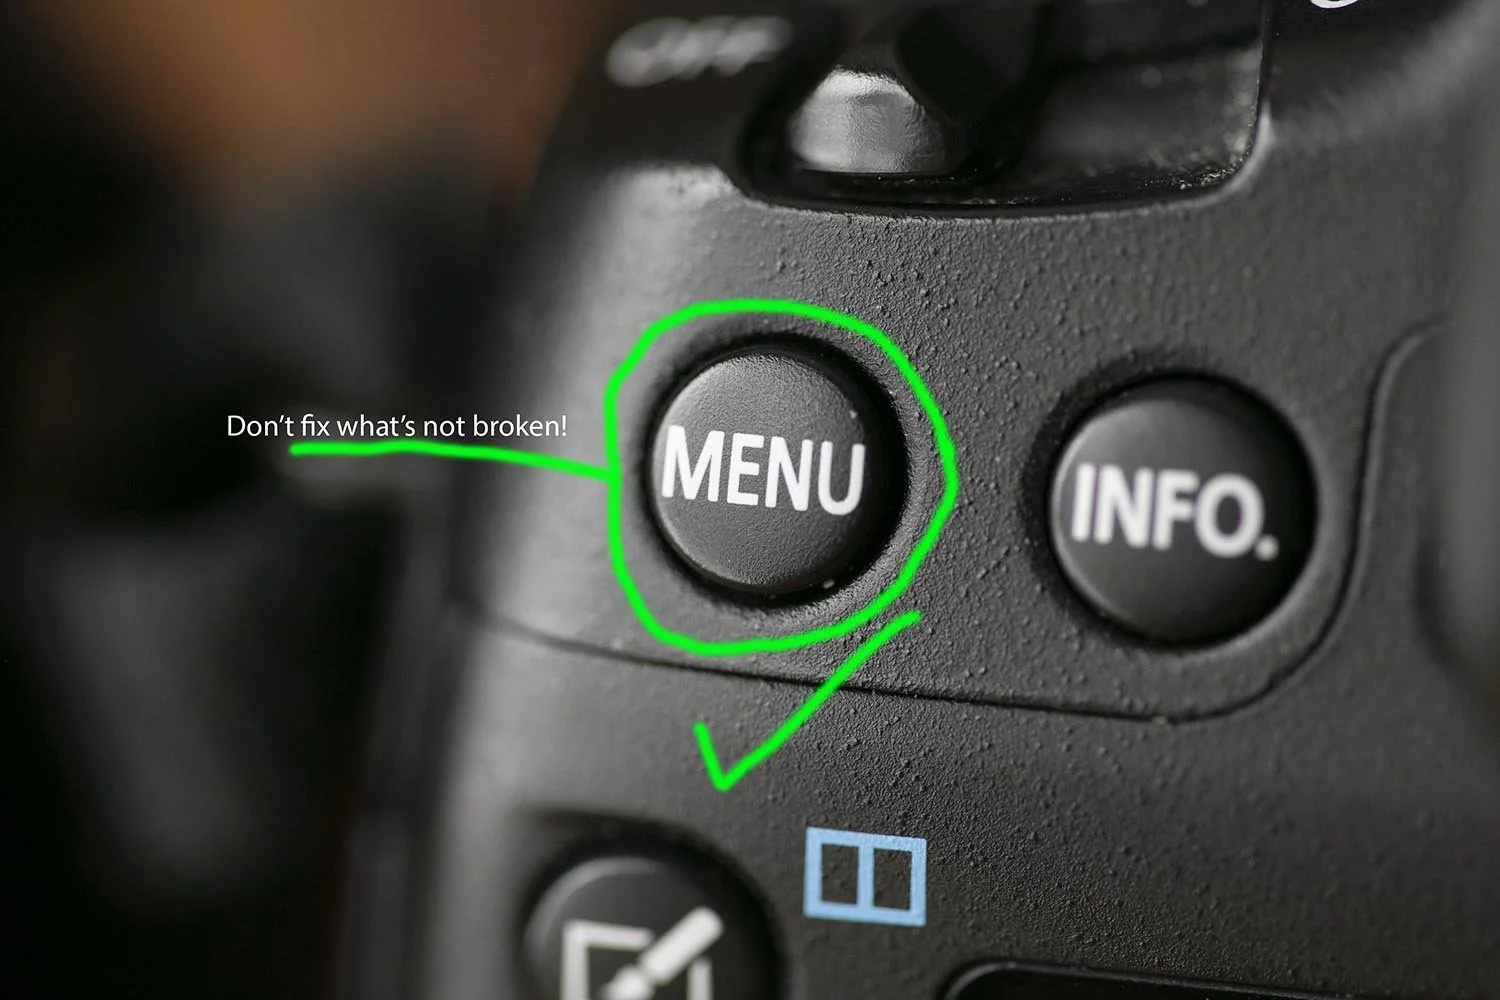
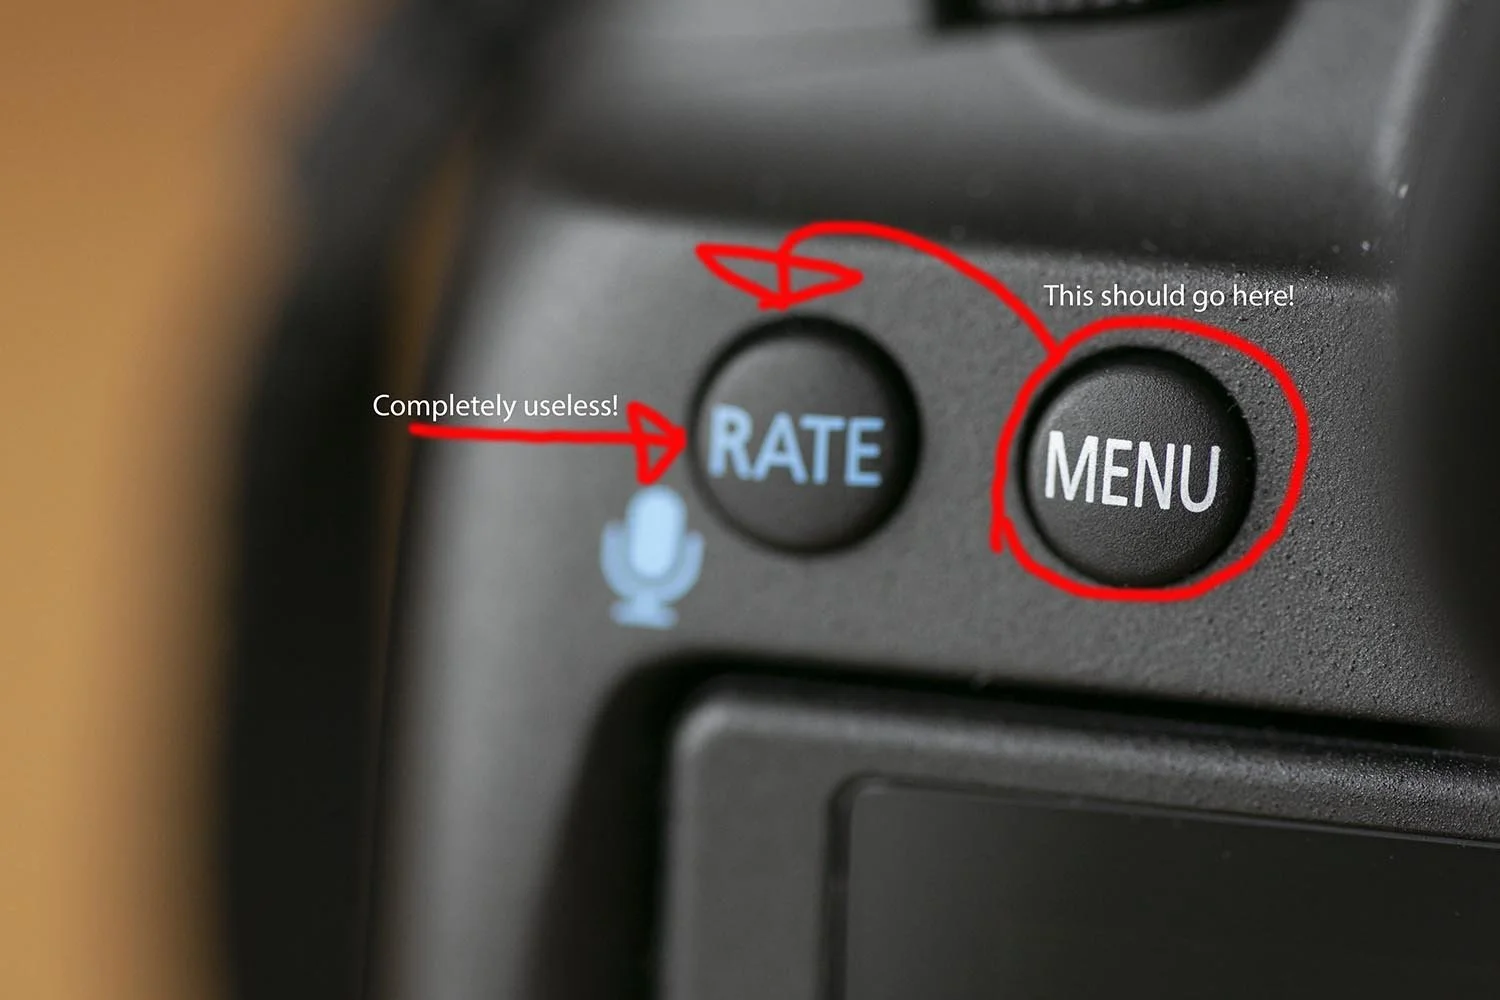
The control layout on the outside of the camera is another story. There are several changes that I have to get used to, the most annoying one to me probably being the most insignificant: the Menu button moved. Not much, but it moved. And it didn't need to. On the 5D IV, it's at the very top-left of the camera. On the R5, it moved over 1 SPOT! It no longer sits at the end of the camera. That spot is now taken up by the Rate button, which is a function that I (and probably many other people) have never pushed except by accident because it's useless.
What is the Rate button, you ask? It allows you to go through your photos and assign them a rating of 1-5 stars in-camera. Because that's an efficient use of your time in the middle of a shoot. The Menu button sits right next to it. I've only had the camera for a week and I can't count the number of times I've mashed that stupid Rate button trying to get into the menu before remembering that the Menu button has taken up residence one spot to the right. Why couldn't they just keep it where it was and put the Rate button to the right, if they really needed to keep it at all?
It's been here for 4 generations and over 15 years.
Why would you do this?!
Video
Switching back and forth between photo and video mode is a little different with this camera. On the 5D, there is a switch on the back of the camera to toggle between photo and video, and the button to start filming is in that switch. The camera also carries over your exposure settings from one mode to the other. That makes it really easy to quickly go back and forth between the two modes while shooting events.
Not so with the R5. To switch modes, you need to push the Mode button on the top of the camera and then the Info button on the back. Once you're in video mode, you can then push the inconveniently-placed Record button that's in the middle of the camera's top plate. Not the most easily-accessible button in the world and nowhere near as convenient as just flipping a switch and pushing a button with my thumb. Once all this is done, I need to adjust my exposure settings, because they don't carry over from the previous mode.
But there's a solution to some of this madness. Almost all the buttons on the right side of the camera are customizable, and a few of them are useless to me. That means I can assign them new functions! I still need to push the Mode button and then the Info button to switch modes, but I assigned the Mode function to a much more convenient location. I did the same for the Record button. No more finger-gymnastics trying to shoot video on the fly! Now I just need to wait for Canon to release an update that makes exposure settings carry over when you switch modes. I won't hold my breath on that one.

Poorly-placed access
One more minor inconvenience, although hardly a deal-breaker: the port for plugging in a remote trigger is too close to the lens. This means that when you pop open the rubber cap covering the port, it pushes up against the lens and it's difficult to wedge the plug for your remote into the R5. Moving the port closer to the edge of the body (like on the 5D IV) or putting it on the side (like the 5D III) would have been a better placement.
But there's a solution to this: Canon has an app that can give basic remote triggering functionality to your smartphone by connecting it to the camera through Bluetooth. That way you won't need to plug anything in. If you choose to connect to the R5 through Wi-Fi, you can have even more control over the camera. The app will allow you to use your phone or tablet as a remote viewer and you can set several of the camera's functions, including exposure.

The rubber cap gets wedged up against the lens because there isn't enough space. An inconvenience, but there are ways around it.
It's Not All Bad, Though
There are some control changes that annoyed me, for sure, but there were also a few that I thought were actually pretty good. The biggest one is the Mode dial. On the 5D, changing modes is simply done by turning a dial. On the R5, it's a 2-step process. There is now a Mode button with a control dial around it. Push the button to tell the camera you want to change modes, and then turn the dial to actually do it. Not a big deal. But that Mode dial serves another function: it adjusts the camera's ISO. It's also in the same place as the ISO dial would have been on many old, mechanical film SLRs.
I thought that was a nice touch and also more convenient than the two-step process on the 5D. That camera requires you to push a button on top of the camera and then turn a dial. The problem is you have to lower the camera to see where the button is. It's much easier to do on the fly with the R5 (like when you're shooting the bride and groom as they make their way out of the dark, dungeon-like church and into direct sunlight).
I also like the addition of a flip-screen. While I try to use the camera's viewfinder as much as possible for events, I do find myself using the lcd screen to set up my shots when I'm shooting food. For that kind of work, the camera's on a tripod and I have all the time in the world to set up the shot, so I may as well. The difficulty comes when I have to to an overhead shot. For this, the camera is pointed straight down and it's around head-height or a bit higher. Obviously I'm not using the OVF at that point because I am not in the habit of bringing a ladder with me into restaurants. The fixed-position lcd screen is also hard to see at this point. The R5's rotating screen, on the other hand, makes overhead shots so much easier to shoot!
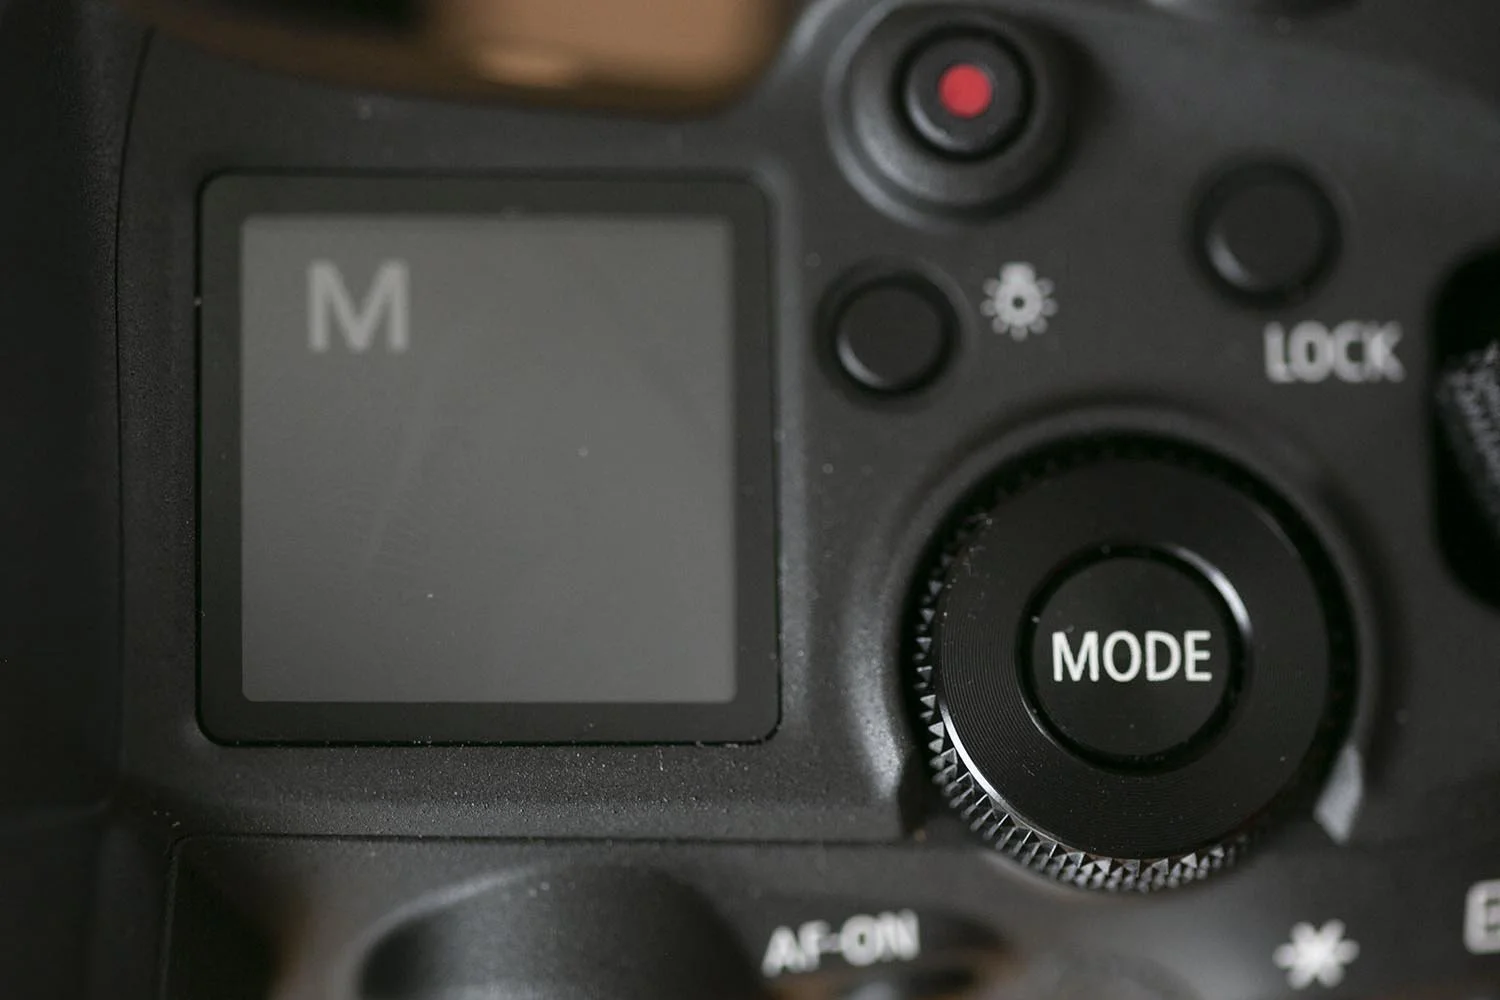
Changing the ISO is as simple as just turning a dial on the R5.

Changing ISO on the 5D requires me to lower the camera so I can see the top.

Shots like this are much easier to set up when you have a rotating screen!
As For Actually Using The R5...
It's a funny story...
My first real test of the R5 was supposed to be the day after it arrived. I was planning on using it for a headshot portrait session. All my lighting was set up and ready to go, but something wasn't working right when I took a test shot. The flashes clearly fired properly, but the frame was completely black! I checked my exposure settings and everything was fine. I took a few more test shots, checking each one after taking it. They were all black frames. I figured it was probably some obscure setting I hadn't checked, but the client was going to be there soon. I didn't have time to futz around trying to figure out what the problem was.
Fortunately, I brought my 5D IV with me as well. I quickly got it set up, took a test shot to make sure it was working (no problems here) and did the shoot. After the client left, I had time to relax and figure out what went wrong with the R5. I took a few more shots, and same thing: all black. Then I checked a setting I hadn't looked at before: the frame rate. Yup. The camera was set to the highest frame rate. A little tech info here: this camera can shoot up to 12 frames a second using the mechanical shutter. That's the setting it was on.
With this setting, you can simply press the button quickly and shoot off 4 or 5 shots. It's so fast that if you aren't paying attention, you don't hear the click of each frame. So I took a look at all the photos on the card. Sure enough, about every 4th or 5th photo was properly exposed, and there were a lot more shots than I thought. Here's what had happened. When I thought I just took a single test shot, the camera actually took 4 or 5 images and the only one I saw was the last one. The flashes only fired on the first shot of the sequence, which meant the others would be black. Oops. Live and learn.

None of these portraits was taken with the R5.

They were supposed to be...

...but they weren't. Oops.
Initial Performance Test
So my real first test of the R5's performance was when I took my dog out to the back yard so I could get some shots of him charging around in the snow like a maniac. This time I made sure the camera actually was set to the 12 frame/second mode! I also tested out a function that I didn't have on my other cameras: eye-priority focus. This is a function that tells the camera to focus on the subject's eye, giving me a much better chance of making sure the eyes are sharp. For anything involving people or animals, nothing else matters unless the eyes are sharp. Trying to do this with a dog charging around at full speed is pretty tough. This was the perfect opportunity to test out the camera's ability to shoot fast action. It did pretty well. I was impressed. There were a lot of blurred shots because shooting something moving that fast and close is hard for any camera to do, but the R5 had a pretty good success rate.
I should point out that I wasn't even using an RF-mount lens for this test (I don't own any). I was using an EF-mount lens with an adapter. If adapters slow down autofocus, I certainly didn't notice it.


A Walk in the Park
My next test was to see how good its dynamic range is. The R5 does have a newer sensor and processor than my 5D IV, after all. I drafted a model and we headed out to a waterfront park to test out the camera in harsh light, which is the toughest lighting situation for portraits. The eye-priority focus had some difficulty finding the model's eyes because of her large, dark sunglasses, but it was still able to focus on her face quite well. It did a pretty good job of keeping detail in the brightest and darkest parts of the image, which was the main purpose of my test.

And The Verdict Is...
Overall, the R5 is a nice little camera. It's smaller and lighter than my 5D so it's easier to carry around, but it's built just as solidly. The autofocus is nice and fast, even with EF lenses and an adapter. The image quality is great, and there's a ton of extra resolution for cropping (46 megapixels, to be specific).
The control layout takes a little getting used to as it's a little different. This is understandable because there simply isn't as much space to put buttons on a smaller camera. Fortunately, I was able to reassign most of the buttons to customize the control layout to suit how I shoot. I say MOST buttons, however. That stupid Rate button is something I'm stuck with.
As for the viewfinder: it's bright and sharp, for an EVF. But it's still an EVF. I still hate EVFs.