Montreal Food Photography: Simulating Daylight - The Basics

There are those out there who believe that natural light is always the best light to use for food photography because it gives the warmest, most organic, most inviting feel to the setup... or something like that. I'm not one of them. Don't get me wrong, natural light can look great. The fact that it's natural, however, does not mean that it will look great. It's entirely possible to walk into a situation with terrible natural lighting conditions - just ask any wedding photographer who's had no choice but to shoot family portraits on a cloudless day with no shade.
It's Good To Have Options
This is where artificial lights (flash, in particular) can come in quite handy, especially for food photography. Before we go any further, I can already hear what some of you are saying: "Flash gives bad photos". I have a saying that I've been using for years in response to that: If you think flash gives bad photos, it's because you don't know how to use it properly. I could say the same thing about natural light. It's quite easy to get bad photos with natural light; all you have to do is not know how to use it properly.
If a restaurant wants you to shoot food on-site but they happen to be a pub in a basement, you probably won't have any natural light to work with. Not a problem, right? All you need to do is set up a basic main/fill setup with a couple of your own lights, and... oh, wait... what? The client insists the photos look like they were done with natural light? In a restaurant that is basically a windowless basement? This could require some creativity.
Creating Artificial Natural Light
Fortunately, all is not lost. Natural light certainly has a specific look to it that many people prefer, but there's nothing magical or special about it. At the end of the day (or at any time of day, really), light is light. It's just subatomic particles called photons leaving a source, traveling in a straight line toward an object, then bouncing off that object and entering your eyes. If you understand the basic properties of light and know how these properties give daylight its unique look, then we can figure out how to use flash to simulate the look of natural light.
Where Do We Begin?
First, we need to understand that there's no one such thing as "natural light". The natural light that we have outside in the middle of a field at 1:00 in the afternoon has a different set of characteristics from the natural light that we would have coming through the window at 10:00 in the morning on an overcast day. So we need to decide what kind of natural light we want.
For food photography, I've always been a fan of the look that we get with indirect light on a cloudless day. It has enough contrast to make colours pop, but it's indirect so we don't have to deal with blown-out highlights or any of the other nastiness that comes with direct, harsh sunlight.
So how do we copy this look? First, let's examine what makes this kind of light look the way it does. We know that indirect window light (the kind of light you get when the window is on the shadow side of the building) is nice and soft. To simulate this, we need to know why it's soft.

This photo was shot using only window light (from the left) and a white reflector (on the right).
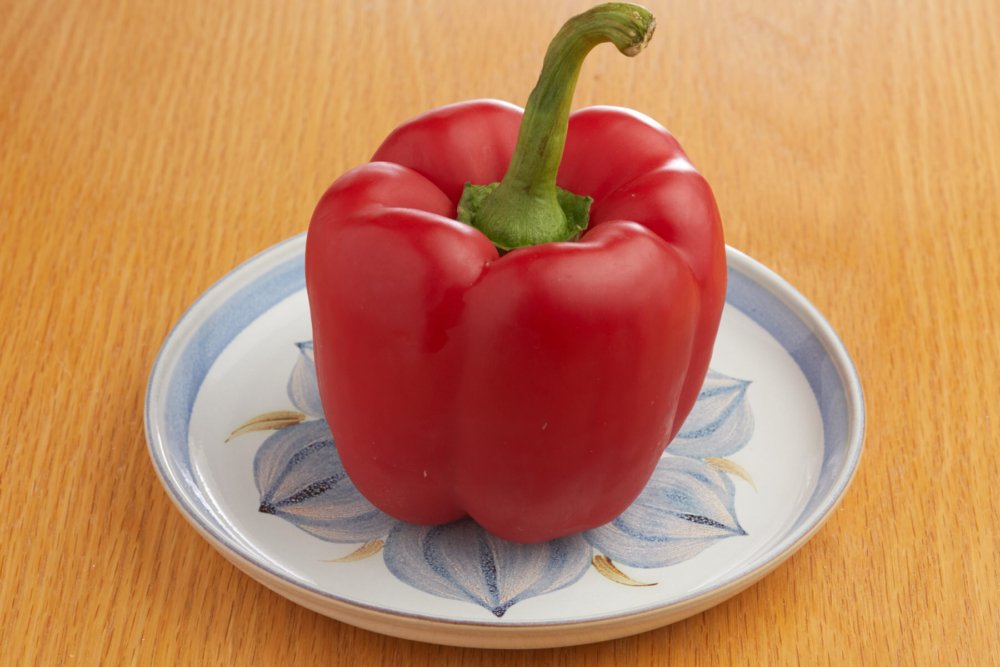
Let's compare it to this one. Was it done with daylight as well?
Bigger is Better
As we learned way back in our early days of studio photography, the larger a light source is, the softer it is. This is why a bare light is harsher than the same light with a small softbox, and why the same light is even softer with a large softbox. Your light source essentially is now the entire surface of the softbox, which is many times larger than the bare light itself.
So we can see why the window light is so soft: our light source is essentially the size of the window. In the case of many restaurants or living rooms, this means the light source is huge! Add in the fact that you may be getting a decent amount of light bouncing off the walls or ceiling and filling in some of your shadows and you have a pretty nice, soft, even light falling on your setup.
Size Doesn't Matter. Relative Size Matters.
So this gives us our first piece of information: our main light needs to be quite large - large relative to the subject, at least. Remember: the sun is huge, but because it's so far away it's relatively tiny as far as light sources go. So we don't need an enormous light source, we just need it to be big relative to our setup. So how do we accomplish this? Move it closer! If our light source is closer to the setup, it will effectively be larger.
Obviously we are using a nice, large diffuser of some kind for our main light. You can use anything you like: an umbrella, a softbox - you could even turn the flash around and bounce it off a white wall or a very large reflector.
So now we've got our diffuser in front of the flash, and it's giving us some nice, soft light. But it doesn't have that daylight feel to it. It still seems like good studio light. What do we do now? Well, there's nothing stopping us from placing another diffuser between the flash and the setup.

There's nothing stopping you from placing a second diffuser in front of your already-diffused main light.
Multiple Diffusers
One of the techniques I use when trying to simulate daylight for food photography is to double-diffuse my main light. The flash is firing through a softbox, and then I hold a diffuser in front of the softbox as close to the setup as I can without it appearing in the shot. Remember what I said about relative size? If I place the diffuser right next to the setup, the light source is now the size of the diffuser. That makes it relatively large and it gives a kind of light that seems to almost wrap around the setup from several directions, just like diffuse window light would do.
If we take a quick look at the two images below, we can see the difference the second diffuser makes. The image on the left only has a softbox in front of the flash, while the one on the right has the second diffuser placed right next to the plate just outside of the camera's angle of vision. The image is a bit flatter in terms of contrast, but the highlights are much less specular and the lighting is more even overall.


What's Next?
We've figured out all that we need to do with our main light. Next time, we'll take a look at adding additional light to complete the daylight look.